
 Rashad Glover
Creating Handouts for Your Meeting
I’m going to keep this chapter short and sweet. There is no need to drag out this chapter just for the sake of filling up a book. I’m going to draft out just a simple layout and show you where to place items within your packet to just keep it simple. This packet should be designed to credential your event as well as yourself. You want people to believe that you know what you are talking about. So make sure that you pub yourself to the fullest (warning, stay humble though).
The first thing you should do is include an agenda of what’s going to happen during the event that you’re holding. As I mentioned in the previous chapter on agendas, it allows you to let people know what they are getting into while giving a sense of organization. The next section of the packet should be a biography on yourself. You can possibly add a photo of yourself in the top right or left corner with some highlights about your skills and qualifications pertaining to the event you’re throwing. Also, this is where you add a little info on your side hustle or full time job.
For example, let’s say you’re holdng an event about entrepreneurship. You may still want people to know you also sell AllState Insurance and how long you have been in that line of work. You never know, you might just strike up a conversation or two about your specific side hustle(s) after the event is over. Later, when someone who attended your event is in need of any related services (going back to the example of car insurance) they will remember you. They will also have a way to contact you.
The next page should be a contact page with all possible ways to contact you. I got this idea from all of the syllabi I read in school. All of the professors had to hand these out and gave us no excuses when it came time to contact them. So make sure you add everything including your Facebook.com (professional pages only), Twitter.com and Linkedin.com info (see chapters on Facebook, Twitter, and Linkedin).
If you have created a slide show presentation using Microsoft PowerPoint, Apple Keynote, or Google Presentations (free with every Gmail account, see chapter on Google Apps), you’re going to want to print out your presentation in hand out mode.
Ideally, your screen handouts allow your attendees to take notes next to the miniature presentation slides. Make sure you add some type of cover letter and make it look professional! Ask your friends, family or coworkers to look it over. It never hurts to have a second set of eyes check out your presentation. Hopefully they give you some constructive criticism.
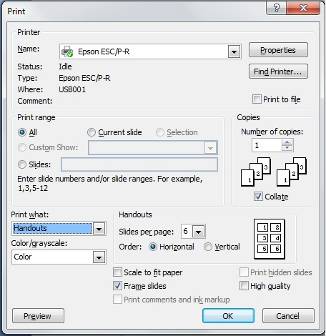
(Screen shot of the print setup from Microsoft PowerPoint)